Tuesday, 6 September 2016

Soundtrack production for the Moving Image Unit 17

Soundtrack production for the Moving Image


Moving Image: (how they are produced and created and purpose)
film:
When still images are shown on a screen one after another to create the illusion of the image moving. This is how any moving image is produced, whether its movies, record cameras or animation. Film(or movies) have more of a professional approach to projects as they have larger budgets therefore they can afford to create more scenes. Hollywood movies  tend to follow the same process when filming:
development, pre production, production, post production and distribution
Films are usually expensive as mentioned before therefore they are created to produce profit as well as being viewed as a form of art.

TV:
TV is very similar to the way films are produced however they have constraints that they need to work around. Firstly TV production companies have smaller budgets meaning they are restricted on the number of resources they can use. Second, TV is demanded by audience faster than a film is, for example a TV show may run every Saturday so episodes need to be shot and produced ready for the release date. Thirdly, pilot episodes are usually created to test whether audiences respond well to a new TV show, if the results are positive then they will be allowed to film the rest of the series. TV film is produced for a variety of reasons from informing audience about a subject to just entertainment, but all TV film is produced with the idea of making profit.

Web:
Web film is created with the intention of distributing the fina product onto the internet. The production is similar but how it is distributed differs from regular film and Tv as it keeps up to date with popular trends of accessing files. So they are created so they are easily streamed.

Hand held devices:
A technique used when a cameraman holds the camera in their hands not on a tripod. Convenient size for travel. Often more shaky compared to a camera on a tripod but when this is a desired effect it is called shaky camera.

Video Tape:
Magnetic tape used for storing film and or sound. Tape is a linear way of storing information meaning the information appears in the same order as it was recorded. When it was first invented it was a new and cheaper way to produce moving images compared to photographic film and became very popular seen in the example of VCR- Video cassette recorders.

Animation:
The process showing still images one after another to create the effect of movement, known as the phi phenomenon. They are different variations of animation which are used to produce a variety of effects on screen.
Flash animation- when a film is created using Adobe Flash to create a project in a SWF file format. The way it works is by using vector mapping. These films are created with the intention of being distributed on the web.

Stop Motion- The process of taking a real life photo of an object then changing the position of that object before taking a new photo. This process is repeated and when played back will look as if the object is moving.

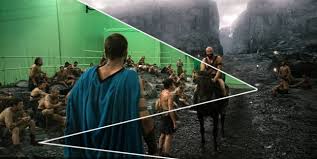
CGI- Computer Generated Imagery is normally done by creating 3D graphics for to create scenery or special effects for film or Tv. How it is created is by filming infront of a green screen and then the graphics is added later in production on the computer.

Audio components: (how they are created and discuss uses)
Studio and location:
Recording in a studio is useful when you want to record sounds that are clear with minimal background interfering. The advantage of recording in a studio is that you can repeat the process if needed to be clearer, the disadvantage is that you can lose natural background sounds which are needed in certain circumstances. Studio recordings are usually for interviews, voiceover and presentations. Location recording is recording outside of a studio which can cause some troubles as you are not protected from natural background sounds, for example wind. With the assistance of equipment such as a dead cat unwanted environment sounds can be softened. The advantage of filming on location is if you desire ambient sound or natural noise. The disadvantage is the sound is not as clear compared to studio.


Interviews:
Interviews can occur in different locations like inside a studio or on the street. So the equipment used to record the audio can vary. If in a studio then smaller microphones can be clipped onto each person who is talking as well as having a boom mic controlled by a boom pole operator. All of the different microphones can then be regulated from the control room. If the interview is on a location then one handheld microphone is usually used, and the interviewer will point the mic towards whoever is speaking at that time. Normally the microphone will have a dead cat attached to it in order to dampen wind or harsh sounds being recorded.

Presentation:
The editing needed for a presentation is limited as it is often to a live audience. Usually there is one presenter who speaks into a hand held microphone and that is then played through speakers so the audience can hear. Before the presentation begins sound checks are used to ensure general sound levels are good from every position in the audience. Audio can also come from a slideshow that includes audio which again is checked beforehand to ensure sound levels are clear for the audience and is played through speakers.


Voiceover:
This is when you record dialogue and use it over a video. Usually this is done by recording dialogue in a studio, as it has less background noise compared to location recordings, and then played over the moving image. This effect can be used as narration for the video like David Attenborough documentaries or replace dialogue.

Drama dialogue:
When watching a drama you can't see any microphones on camera. The reason for this is the drama is seen as an on screen world (the world that the characters are in is real). So to get around this problem boom mics are used to capture the actors dialogue. Each actor is assigned to a separate microphone so that sound levels ae balanced.

Ambient  Sound:
Ambient sounds are the background sounds that can be heard in the moving image. Examples of this are wind, birds and traffic. Because ambient sounds are background noises they can be recorded either on set of film production or later in a studio. If the sounds are recorded on set then some problems can occur like the dialogue of actors interfering with the ambient sounds and the sound jumping if two recordings are taken of the same scene. To avoid this sound crews can record the background sounds slightly longer than the length of the scene separate to the dialogue and then edit it in the studio later on.


Sound effects:
If you ever watch a movie and hear the sound of a gun firing or a sword being drawn from its sheath, the chances are it was a sound effect created in a recording studio using Foley. Foley is when you add sound effects to a moving image after it has been recorded. An example of this would be filming a horse gallop, then record the sound effect afterwards. A Foley artist is someone whose job it is to create sound effects for moving images. In order to create the sound effects, the artist uses anything they can find to create the desired sound. This can be anything from sheets of metal to a heavy phone book.

Stationary and moving sound sources:
A stationary sound source is when something creates a noise from the same position. This means that the microphone picks up the sound from the same location. A moving sound source is when the source creating the sound moves, a perfect example of this is when a car drives past you, and this is caused by the Doppler effect. This effect basically means sound sources which are further away sound quieter and then get louder as they get closer. The reason this occurs is because at a far distance the frequency of the sound is lower then as it moves closer to you becomes more compressed and creates a higher frequency. If you use panning on stereo recordings then it is possible for you to move the sound from the left to the right or vice versa to create the effect of the sound sources moving passed you.


Use of presence:
Presence means when you creates sounds to the effect that it came from afar or closer to the audience. This effect can be created simply by changing the sound levels. So if you want a sound to appear closer you would increase the volume, if you want it further away then make the sound quieter.

Relationship between sound and picture: (how they are used ion final production)
Diegetic:
When a sound comes a source which can be seen on screen is known as diegetic. Examples of this include characters speaking or the sound of knocking on a door and that action is visible.
Non Diegetic:
This is the opposite of diegetic, so when a sound is heard but the source of that sound is not seen. Things like narration and the soundtrack are considered non diegetic.

External diegetic:
Sound that can be heard from both the audience and the characters are defined as external diegetic. An example of this is when a narrator talks to the audience but can also be heard from the characters in the movie as well.

Mood:
Mood is how the character is feeling and the atmosphere created in the film, this can be emphasised by the use of sound. For example when a character is sad rain can usually be heard as a way to get across o the audience what mood is felt in the movie.

Meaning:

Illusion:


Examples:
Here is an example that was completed in class to demonstrate the process of creating the sound effects. First we were given a number of different videos we could choose to import into Cubase. Then we were given a microphone to record various sounds that we could use as SFX for the video clip. In the example I recorded myself stamping on a box of rocks to create the sound of someone walking. For the wind, I rubbed the microphone across the back of one of the fabric chairs at the same time as watching  the video so I was in time. After that, using sound editing techniques like fading and compression I edited the audio to my preferred liking.
(Add screenshots and clip of walking  video)

For the second example, I was given a video clip of a city by the sea and imported it into a new Cubase project. Next, I added a marker track by going to project, add track and then marker. The marker track is to help us view when the video transitions from one scene to the next. To do this I watched the video, then paused it when a transition occurred to see the exact moment when a marker was needed. Using the pencil tool I could place a marker. Once all markers were placed, I used a website called Freesound.org to download some premade sound effects. The process of adding the sound effects then became similar to the first example.
(Add screenshots and clip of city by the sea)

Soundtrack


  • Listened to examples
  • Worked on opening theme
  • Worked on character snippets
  • finished opening theme
  • recorded sound effects
  • worked on ending credit
  • went off site to record sound effects
  • finished ending credits


Wednesday, 8 June 2016

Setting up a live Performance Unit 48

Setting up a

Live Performance


Equipment List:
  • Mixing desk, Yamaha EMX 5016 CF 
  • Power Amp, ASX 18 dB Technology for mixing desk, the t.amp A1400 for main speaker, the t.amp A 2400 for the sub speakers
  • Sub Speakers
  • Main Speakers
  • Support pillars
  • XLR cables
  • Speakon cables
  • Jack cables
  • Masking Tapes
  • Power leads
  • Shure SM58 microphone
Tick List of steps taken:

  • First thing you do is take the lids off the mixer and power amp
  • Keeps lids to the side for safety reasons
  • Keep mixing desk on power supply and move desk into position, behind the speakers and a little to the sides
  • Lock the wheels on the power supply to stop it from rolling
  • Move the bass bins into position, one on the left and one on the right of centre stage
  • Add the support pillars and make sure everything is secure
  • Set up main speakers on top making sure the left and right are about the same height for balancing purpose later, when lifting the speaker use two people and lift with your knee
  • Connect the speakon cables to the power supply by slotting in the ends and twist to the right to ensure it is secure
  • Tape down all loose wires to avoid tripping over wires
  • connect mixing desk to the amp with jack leads
  • plug into the mains, make sure everything is turned off beforehand and flatline the mixer volume, gain otherwise feedback will be a problem
  • Add XLR cable to mic, input on channel one
  • Turn on desk first, check desk to make sure everything is flatlined first
  • Turn on speakers, keep mic behind speaker at all time otherwise feedback loop will occur which can cause hearing problems
  • Level testing, slowly turn up the channel 1 volume and have someone in front of speakers, they will say whether it is too loud or if panning is needed
  • After testing the volume, test the gain, then the EQ, then the effects if wanted
  • Repeat process for any input, e.g. guitar, drum mic, electronic piano
  • After performance pack everything away making sure all wires are put away so they dont tangle and all equipment back how it was found
Risk Assessment


Thursday, 28 April 2016

Composing using Music Technology Unit 49

Composition

Final Composition: https://soundcloud.com/user-416631632/j_wells-composition

Composition Skills
Form:
Form is the layout of sections with in a song. The form is created using chord progressions, an example of this is Am, F, C, G chord progression. The form is written using letters to represent different chord progressions. During lesson we were given a simple form that we used as a base for a possible composition idea. The form was given A, A1, B, and A1. A means one 4 chord progression, A1 is the same chord progression but with a little difference to add flare to the composition, B means a new chord progression with different chords and something different to the A section. Finally it goes back to the A1 section. This form was used to create a basic verse on Cubase, then we were allowed to extend the composition by ordering the song into a structure.

Structure:
The structure is the order of a song. So a common structure in pop music is using ABABCB where A is the verse, B is the chorus and C is the bridge or middle 8. There are different sections which are created with different forms but flow together to create the overall song. The chorus is the catchy repetitive part of a song, sometimes called the hook, which is normally the section of the song that people remember. The bridge or middle 8 is the section of the song which connects the verse and chorus and is the section that normally contains a solo. Whilst experimenting with structure on Cubase I managed to create a verse and a chorus which will be repeated but when repeated will have additional layers to help with originality and creativity.

Genre:
Rock, classical, funk, country, house are all different genres of music. Genre means the style of music and each style has its own type of structure, form and techniques which makes it different to other styles. For examples 12 bars blues is usually used in blues and jazz music whereas spanish culture music would use a structure like AABA (Spanish Romance).
Dance (Disco) - Dance music uses 4/4 time signature as it is an easy to dance to and keep rhythm as well as a 120 bpm. THe reason for this was so that in clubs you could transition between songs with ease so people would continue dancing.
Jazz (swing) - A major hit in 1920's America, Jazz music normally uses a 12 bars blues structure as well as contain a variety of brass instruments including trumpets and saxophones. It was another form of dance music and uses music notations to create a swing effect in the music.


Statement:
Statement in music is to make something stand out from the rest of the music, this could be a message from the vocalist or a new instrument introduced into the song for a solo.

Repetition:
Repetition means to do something a multiple number of times. In music this could be repeating a chord progression four times before changing to a new progression. In my composition repetition is most likely going to be used as I will probably repeat the chorus or a section in the song as well as melodies and chord progressions.

Inversion:
Inversion in music is usually changing a chord or melody and flipping (or inverting) the notes around so that the notes are played differently. An example would be if you play an A note, then the inversion of that would be E.

Difference:
The idea of how other genres of music are unlike each other and how within a genre you can your composition stand out, for example classical music will usually have a piano but hip hop normally has a drum kit, then in classical different chord progressions and forms are used to structure the song.

Individuality:
Something that makes you stand out.

Originality:
Something you have created and is unlike anything else.

Composers Rights:
A composer is someone who writes music. They are the original owner of their music so anyone else who uses the composition they have written need to ask permission as well as give royalties to the composer if the music is used to make profit.


Sound design

Sampling Techniques:
A sample is a short clip of an audio file that can be manipulated for your own purposes. Samples can be used in composition to help create originality and individuality. One technique we can use is by using the internet and downloading sound effects, for this assignment we will use free sound. Then if a clip is too long in cubase then you can use the snipping tool.

Another technique we can use is when the sample is uploaded into cubase, select the track you want to edit. Then go to audio at the top toolbar, process and you can can change the track. For example you can use time stretch which always you to extend or shorten how long the sample is played. Another process that can be used is the reverse, which flips the sample.


The third we leant about was to use sample of other music and edit them so that we could create a new beat or rhythm. We uploaded songs from the VLE into Cubase, then used as before used the snipping tool to select which section of the tracks we wanted. From there we used the process bar at the top of the screen to change the sample.


The final technique we can use is by double clicking your selecting track and changing the waveform. For example we can use audio warp to change the length of individual sections of the track. Another thing we can change is the variaudio which is a way to change the note of the track, this works better with melody lines.


Waveform Structure & Waveform editing techniques: Screenshot using Sylenth
In the final composition I didn't use any sylenth tracks as it didn't suit the genre I was creating however I did experiment with the lead tracks which could have been used if the composition was in the house genre.


Availability:
Software Inputs: Hal-ion and sylenth tracks used.

  • Clean Guitar
  • Bright Alto Sax NoteExp
  • Clean Guitar
  • Electric Bass (Picking)

Analogue and digital inputs- DI and microphone tracks used

  • Left Pan Clap (DI)
  • Right Pan Clap (DI)
  • Intro Chords (microphone)
  • Sample 2 (microphone)
  • Sample 3 (microphone)


Editing sources: For most MIDI tracks I have added several effects and grouped them using FX channels. On every track there is EQ to balance the frequencies. On the melody tracks, reverb has been used. For tracks that were recorded or a DI I have needed to use compressors so the higher frequencies are not heard. As for the samples, I have used time stretch and reverse to create the sounds that I wanted.

Sound libraries- Groove agent and Freesound.org.

  • 03 kick hit (Groove Agent)
  • claps 01bb21 (Groove Agent)
  • hardkit low tom (Groove Agent)
  • hardkit mid tom (Groove Agent)
  • hardkit high tom (Groove Agent)

Playback equipment: Headphones used. The headphones used during the composition

File transfer: Pull based transfers, push based transfers, how MIDI is transferred. There are two kinds of file transfers which are known as Push based and Pull based. Push based is when the sender of the file initiates the file transmission request. This means that the computer sending the file sends a message to tell the receiving device a file is about to be sent. Pull based file transfers are the same except instead of the sender initiating the file transmission request, the receiver sends it instead.

Formats and compatibility:  A MIDI file is the file which has a set of instructions which tells the computer what to do. For example the instructions could say play a C note, for 5 seconds with the sound of a saxophone. This is beneficial as it takes up less space compared to an audio file. An audio file is the file which stores the digital version of a recording which was originally analogue. The computer would have used an ADC to convert the analogue inputs into electrical signals which could be recorded as digital data. The benefit of using this file is that it can be easily accessed by any computer by using formats such as MP3 or WAV. Cubase files (CPR) are files which used to store the progress made when creating a Cubase project, they store the information of the tracks listed, the length of audio files as well as everything found in the Cubase window. This can be beneficial because without this file and Cubase on your device, you won't be able to access the project you have created.

Copyright issues:
There are many clearances and laws that we need to follow so that no one is sued for any reason. First of all, copyright laws apply to this remix, as John Legend owns the song, therefore all royalties and payment of this song will go to the original owner and not the client. Next, we will need permission from the publisher before anything can be recorded. Without this acceptance it is not possible for us to record vocals, chord progressions or anything from the original song legally. Copyright licenses that need to be bought include a mechanical licence and a sync licence. The mechanical licence allows the remix to be played in a public area and the sync licence allows us to record the vocals and chord progressions of the song. As well as these copyright licences, in order to remix the song and use samples, you will need a sample licence. This would enable you to legally use samples in the project.

Licences needed are not free and the prices can vary, I would estimate the price of all the licences to be around  £2500.
·      The producer of the original song offering a quote will decide sync licence; this is usually a one-time payment.
·      Mechanical licence can be as cheap as £15 for a one off licence but prices can be increased.
·      Sample licence cost will depend on different factors, from how long the sample you are using to how many samples are used in one track.
Regulations:
The music industry has changed drastically with in the last 15 years; nowadays most albums can be found on the Internet and streamed or downloaded for free. The biggest example of this is YouTube, with over a billion users. This has led sales of CD’s to decrease, as people don’t want to buy something when they can get it for free. This change has caused a drastic change for artist because they won’t get paid as much for selling CD’s as they once did. Instead artists have to rely on tours and festivals as the main income. Previously this wasn’t the case as artists relied on the distribution of CD’s with the help of record labels.  

One example in the industry where the artist refuses to stream music is Adele. She doesn’t allow her music to be streamed or give permission to put her music online without her consent. She would rather sell physical copies of her music to her audience.
When marketing and promoting the client, there will need to be several regulations that will need to be with in copyright laws and regulations. PRS (performing rights society) and MCPS (Mechanical copyright protection society) are societies that collect royalties and allow the licence holder to play music without getting into trouble. This will be needed, as well as the mechanical licence and sync licence, especially for this specific project because this will give royalties to the right people. Also helps the client from other people uploading the project without permission.


Mixing/Mastering:
Mastering to CD:
When you mix the final version of the track you want to mix down to CD quality. The settings will be in WAV format, using 16 bit and 44.1kHZ sample rate.

PQ codes:
PQ codes are used to separate tracks on a CD so that it is easier for users to locate specific songs or play  in a playlist. The way they work is by having PQ flags that mark the end and the start of a song which are then encoded onto the CD. These codes are normally added using PQ editing tools.

MP3:
 MPEG Audio Layer 3 is used to compress a file and keep it close to CD quality. The benefit of using MP3 files is that they have a smaller file size compared to WAV meaning easier to download and stream.

WAV:
 Uncompressed audio files used for many purposes like audio to CD quality and PC audio file formats. The benefits of WAV files is that they use lossless compression meaning no data of the sound is lost at all. Another benefit is that they can achieve high recording rates such as 192KHz.

AAC:
 Advanced Audio Coding is a file type that uses lossy compression and was designed to achieve better sound quality compared to MP3 files. Benefits of using this file format is that it is better at compressing audio with lower bit rates.

Internet distribution
Internet distribution is the ability to transfer files directly from the seller to consumers. This is very important in the music industry as the sales of CDs has decreased due to the technology takeover. People use the internet for most things including buying music, so they need websites that can give them what they want immediately. An example of an internet distribution site include ITunes as they sell MP3 files to wide range of consumers which is mostly direct (excluding the factor of time taken to download files)

Compression:
Compression is an effect used to balance an audio file by making the louder sounds quieter.
Multiband compressor is a type of insert which can be added to help balance the project further. To open multiband compressor you go to the effects window as stated earlier, click inserts on the left, go to dynamics and press the multiband compressor. When the window opens, you will notice 4 compressor graphs and these represent different ranges of frequencies. This insert allows you to compress different frequencies.

Loudness:
When you are mixing it is important that when you mix your composition the main track volume that it doesn't go over 0db as this can lead to clipping later in the track.

Equalisation:
 EQ stands for equalizer and what this effect does is to balance the track and can be done by boosting or lowering frequencies in the track. 
In order to get the EQ up, click on your chosen track and on the left hand side of the screen press the e button. This button will open up the equalizer window where you are able to change the frequencies played. Each dot on the screen is what you use to change which frequencies you want to hear more.

Sonic Problems:
There can be many problems in your tracks such as clipping or the overall recording not being balanced. So to avoid these you can open the mixer, play the recording and change the volume of tracks so that the output doesn't turn red but can still be heard. Clipping is when a track is suddenly cut making a clipping sound at the end. This can be avoided by using the snipping tool. You can zoom into the waveform really close and snip the track when the audio has finished. Another way you can stop clipping is by using faders. This technique involves using the fading effect which will gradually decrease the volume of the track automatically avoiding the final audio from being heard.


Composition Ideas:
Different ideas that could be used to for the final composition

Idea 1: Pop ballad
Look at Robbie Williams, Adele
Generally emphasising the emotion of the music, slower than regular pop songs, Verse Chorus structure, synthesisers to emphasise certain elements, key of D

Idea 2: 80s Rock
Look at ACDC, Guns n Roses, Queen
Guitar solo, Verse Chorus structure, consist of electric guitars, drums, bass guitar, metal sounds, distortion inserts
Idea 3: House
Avicii, David Guetta
Arpeggiators, four to the floor base, side chain compression, repetition used with new layers to help separate sections, structure can be different from regular Verse Chorus structure, lots of electronic sounds


Logbook:


05/05/16: Created a chord progression using the key of C, created a drum rhythm to complete throughout the entire song. Structured the song to have an intro, verse, chorus, verse 2, chorus 2, bridge and a final chorus.
10/05/16: Added lead guitar and bass MIDI track. Experimented with inversion
12/05/16: Added 2nd verse, 2nd chorus and started a solo and a melody line


17/05/16: Recorded lead guitar, finished solo, finished structure of song (intro, verse, chorus, verse, chorus, bridge, chorus), changed Lead guitar from DI to MIDI and Intro Riff to DI
19/05/16: Recorded drum samples, added more drum layers to the overall track
24/05/16: Mixed and mastered the final track


Tuesday, 5 April 2016

Ready to release? Mixing And Mastering Unit 48

Mixing and Mastering

Original Material Mixed and Mastered: https://soundcloud.com/user-416631632/stick-together-mixmaster
Remix Material Mixed and Mastered: https://soundcloud.com/user-416631632/7na-mixed-and-mastered

Mixing

Organisation

First I organised the tracks into separate colours and an order, which is easy for me to understand. So All vocals are in red, all brass tracks are in yellow and all drum kit are in green.


The next thing I did was to delete any unwanted sections whether its silence on the track to headphone bleed. In order to do this I used the scissor tool, located on the toolbar at the top of Cubase, and I split each track into sections. Then deleting the sections that I didn’t want. As a rule when deleting sections, only delete a pause in the recording if it is more than a bar otherwise the recording doesn’t sound right. For example if you cut a pause only a beat long then the recording would clip and sound unprofessional.


After getting rid of any unwanted sections, we created three new FX channels; these channels group similar tracks and add the same effect to all tracks. To group tracks you create a new track called FX channel.


Effects

EQ
 EQ stands for equalizer and what this effect does is to balance the track and can be done by boosting or lowering frequencies in the track. 
In order to get the EQ up, click on your chosen track and on the left hand side of the screen press the e button. This button will open up the equalizer window where you are able to change the frequencies played. Each dot on the screen is what you use to change which frequencies you want to hear more.


Balancing
 Balancing is the process of changing the volume of every track so that the overall sound of the recording is to a professional standard. To make balancing easier, you can open the mixer that is in the screenshot. To open this mixer you want to go to devices on the top of the screen and click on Mixer (F3). It will open the mixer where you will be able to see the volume of each track and change them as you see fit. 


Compressor
 These screenshots show that compression was used on all the tracks. I decided to only add compression to the FX channels instead of each individual track due to the fact that the recordings were grouped together so that is was easier to add effects. This shows that it is easier to group tracks together.


Reverb
 These screenshots show the reverb that was added to the FX channels. Reverb is the effect, which makes the track sound like the recording is echoing in a room, this effect can be heard in large theatres which is known as natural reverb. 
Reverb is another kind of insert so is accessed like the compressor, but instead of going to dynamics you go to the reverb and click RoomWorks. This will open the reverb window where you will be able to see different dials from pre delay to diffusion. The pre delay delays the effect n the track and the reverb time is the duration of the effect. I decided not to add reverb to any of the drum kit because drum kits don’t normally have any reverb on.


Automation
 Automation is changing an effect when the recording is playing. To access you need to expand your chosen track on the left hand side until you see the R button. Press this button and it will allow you to edit an effect. As you can see I have used automation on FX channels to change the volume during the guitar solo but you could change the reverb or compression of the sends. All you would need to do is change where it says volume to whatever effect you want. To change the volume I clicked on the line where I wanted the volume change to begin, then clicked somewhere else on the line. The dots that appeared can now be moved to change to the volume.


Expansion
 Expansion is the opposite of compression so they can be used to boost the volume of a recording. I used the expander effect on the piano as most of the tracks also had compression as well. To access the expander effect, you do the same process as looking for the compressor but click expander instead. The window looks similar to a compressor but just in reverse, the lower the threshold the louder the frequency heard.


Fading
A fading effect was added to the end of the track to stop any clipping from being heard at the end of the project.

Gate
A gate is another type of insert which is used similar to a filter. In a recording you want the instrument you are recording if there is any background noise then you can use a gate to get rid of it. This works because the background noises are low level frequencies whereas the instrument you are recording has a high level frequency. The gate allows you to filter the sound you want without the background noise being heard.
To use the gate, you need to again open the EQ window add an insert and you can find gate under dynamics. From there you will be able to change the threshold, attack as well as the other things like the hold.

Distortion
This is insert can be used on tracks to change the characteristics of a sound from the waveform to the sound. This effect has been added on the guitar solo track to emphasise the guitar during the solo. To access distortion, you select your chosen track, open the effects window, add a new insert and look under distortion. From here, depending on the distortion VST you selected, will open the distortion window. This window will allow you to change the volume of distortion, the percentage of the sound which is affected as well as other settings which can be seen in the screenshot below.

Track list


Track

Effects added

Additional Notes

Lead vocals

Sent to vocals FX


Back Vocals 1

Sent to vocals FX


Back Vocals 2

Sent to vocals FX


Guitar

Sent to guitar FX, panning

Panning to the left to balance with bass in right

Guitar Solo

Sent to guitar FX, distortion

Distortion to emphasise the solo

Bass

EQ, compression, reverb, panning

EQ boosted higher frequencies

Cymbals

EQ, compression,

Higher frequencies boosted and fading at end of project to sweeten the sound

Hi Hat

EQ, compression,

No reverb as I didn’t like the sound it created

Kick Drum

EQ, compression,

Lower frequencies boosted

Snare Drum

EQ, compression,

No reverb as it is uncommon to put reverb on drum kits

Piano

EQ, expansion

Expansion to increase overall volume due to the original being quieter than I preferred

Trumpet

Sent to brass FX


Trombone

Sent to brass FX


Guitar FX

EQ, compression, reverb, automation

Automation in the solo, effects used on all tracks sent to channel

Brass FX

EQ, compression, reverb, automation

Automation decreases volume during solo so brass doesn’t overpower the guitar

Vocals FX

EQ, compression, reverb

Reverb added to all tracks sent to this channel, common effects used on vocal recordings

Mastering

Formatting
Format means the settings for the project when you mix down. For both tracks the format will be of CD quality due to the fact it is a common format for high quality audio. The settings will be in WAV format, use 16 bit and 44.1kHZ sample rate. To mix down a track you click file on the toolbar at the top of the screen, go to export and press audio mix down. Here you will have a settings page pop up and this is where you change the format to CD quality. Then add this WAV file into a new cubase project to master. This is one way to format a track. The other way to format is by opening the mixer window, opening the effects window on the mixer and add inserts. This way of formatting allows you to master your overall track as well as mix individual tracks at the same time. 

Multiband compressors
This is a type of insert which can be added to help balance the project further. To open multiband compressor you go to the effects window as stated earlier, click inserts on the left, go to dynamics and press the multiband compressor. When the window opens, you will notice 4 compressor graphs and these represent different ranges of frequencies. This insert allows you to compress different frequencies.

EQ
EQ the stereo output is the same as EQ on individual tracks. The only difference is how to access the window. To access the EQ window for the stereo output you open the mixer window and press the e button on the stereo output slider. Then adjust the EQ levels to something that suits your preferences. 

Level of Mix
Levelling the mix is to ensure the volume of the overall track is at a high quality. To do this open the mixer window and position the stereo output slider, the slider on the right of the window, close to 0 db. Then adjust the output on your computer to change the volume of the project. the reason we do this is to make the balancing of the project more accurate and to keep it from being too quiet when you mix down. Another thing to consider when working with the level of mixing is sweetening the sound. This means to make the track richer sounding. To do this I took regular breaks to ensure I do not become deaf to improvements. 

Remixing Material

Track List
Track
Effects
Additional Notes
Bass Left
Panning
Panning to left balances with Bass right
Bass Right
Panning
Same as above but vice versa
Intro/Outro Beat
Expansion
Increase the snare and hi hat
Verse Beat
Expansion
Increase snare and hi hat frequencies
Breakdown arpeggiator
Sent to arpeggiator FX

Verse arpeggiator
Sent to arpeggiator FX

Intro/Outro arpeggiator
Sent to arpeggiator FX

Lead Intro
Sent to lead FX

Lead Breakdown
Sent to lead FX

Lead Breakdown 2
Sent to lead FX

Chords
EQ
EQ and used to lower bass frequencies
Lyrics
EQ, Compression, Reverb
Vocals have these effects normally so the lyrics track uses the same effects as they represent the vocals
Reverse Cymbals

Effect track so no added effects needed
Scream

Effect track so no added effects needed
Lead FX
EQ, Compression
EQ balances out the different volumes of the lead tracks
Arpeggiator FX
EQ, Compression
Compresses the frequency range of all arpeggiator tracks

Mastering Screenshots

Formatting
This project was formatted by mixing down the remixed material to CD quality and then placed in a new empty Cubase project.


 EQ

Multiband Compressors
This project i wanted the bass to be more noticeable so I compressed the higher frequencies and left the lower frequencies alone.


Balancing
The final balance was easier than the other project as i was only balancing one track. I still had to make sure I was sweetening the sound by taking regular breaks and making the overall recording sound richer.